Mutated Tank Build – New World Season 10
Mutated 3 expeditions in New World is some of the hardest PvE content in the game, and this Mutated Tank Build for New World Season 10: Nighthaven will help you to stay alive and support your teammates as best as possible. The primary difference between this build and some of the other common tank builds is that it uses The Wall gear to help in mitigating damage from all elemental damage, which is abundant in mutations. The Greatsword Tank Build is also very viable for Mutated Expeditions, assuming you modify the Jewelry and Tower Shield to adapt to the weekly modifier.
Weapons
Mainhand
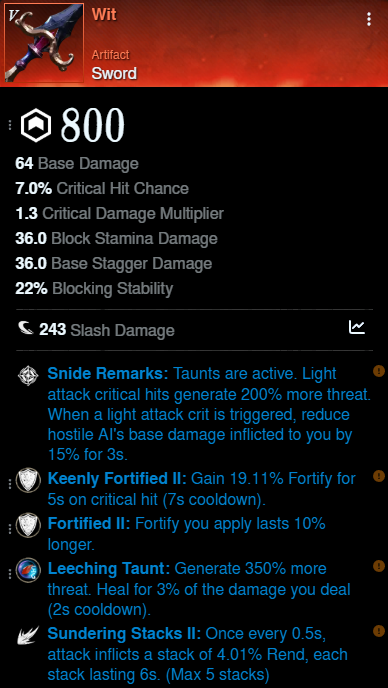
Wit with:
Taunt Gem
Keenly Fortified
Defensive Perk of choice
The Wall with:
2 defensive Perks of choice

Offhand (options)
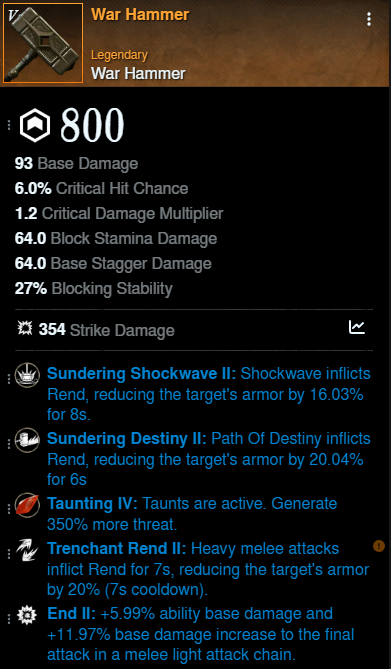
Hammer with:
Sundering Shockwave
Sundering Destiny
Taunt Gem
Trenchant Rend
Greatsword with:
Energizing Counter
Skill Tree
If you are using Greatsword as an offhand for tank, replace Relentless Rush with a 1 point Skyward Slash.
Attributes
| Strength | 200 [fill the rest] |
| Dexterity | 5 |
| Intelligence | 5 |
| Focus | 5 |
| Constitution | 350 |
Armor
This gear serves as a starting point to build upon as some of it may get replaced when you come into Set pieces with infixes. Infixes should replace your least favorite fixed perk on each piece. The Gem slot serves as your defensive piece with an Onyx.
- Weapon Perks
- Fortifying Shield Rush
- Accelerated Resolve
- Gem Slot x5
- Grit Ward x5
- Fixed Perks
- NO SHIRKING
- Lifestealer’s Draught
- Prolonged Favor x2
- Slash Conditioning x2
- Strike Conditioning x2
- Elemental Aversion and Physical Aversion to fill the gaps
Jewelry
Pick the best Protection amulet that matches the most common damage you will be taking in the activity you are in. Assume all perks are the new “II” or “2” versions.
Amulet Perks:
Protection
Well-Being
Gem slot
Grit Ward
Enchanted Ward
Ring Perks:
Blooddrinker with:
Leeching
Enfeebling
Earring Perks:
Despised
Refreshment
Gem Slot
Leeching
Refreshing Move
Some of the Offensive and Defensive sockets are flexible for your to pick the your preferred perk.
Heartrune
Typical Buffs and Trophies
You should ideally have 5 buffs above your health bar, and Major trophies at each of your 3 houses matching the enemy type you are facing. For example:
- 3x Major Angry Earth Trophies – 3×5%(15%) Angry Earth Damage
- Infused Angry Earth Coating – 15% Angry Earth Damage
- Infused Angry Earth Ward – take 10% less damage from Angry Earth enemies
- Powerful Honing Stone – 7% Empower
- Desert Sunrise – reduce duration of incoming DoTs by 25%
- +48 food
How to Play
- Resolve
- Stoneform
- Whirling Blade
- Shield Rush
- Swap to offhand when safe
- Shockwave
- Destiny
- Armor Breaker on single target
Run into the center of a mob clump, and activate Resolve to taunt as many enemies as possible. In a higher-level mutated expedition your teammates will ideally be waiting on your to engage other enemies.
When you have the clump all on you, activate Whirling Blade to do damage to the entire clump and maintain aggro. On large clumps, the cooldown of this perk will be reduced significantly. If taking too much damage or being staggered to much, activate Stoneform to become uninterruptible for 4s right when you are attacking the clump.
Aim to land a clear and intentional Upheaval on atleast 1 enemy – to reduce resolve’s cooldown by 25%.
After this, rotate 1 heavy attack and 3 light attacks, and repeat to keep Rend and Empower applied.
Offhand abilities are generally best to save for Elite enemies and bosses when you need to apply extra Rend or Weaken.
Empower details
| Powerful Honing Stone | 7% |
| Empowered Stab | 30% |
| Leadership | 10% |
| Total | 47% |
Empower is capped at 50%, but having more than 50% can help you manage to stay at cap at all times. To know where your current Empower total stands, check out the Empower Calculator. Even with Defiant Stance taking 15% empower away, you are still able to hit Empower Cap with a timed rotation.
Tips to Remember
Being fully aware of the damage types you will encounter in each Expedition, and specifically what damage the bosses do will be very important so you can spec your gear and survive accordingly.
I do not use Fortified Shield Rush in this build, because this perk is best suited as a Tower Shield perk, and Tower Shields with the correct protection type AND Fortifying Shield Rush are very rare. And if you ran Shield Rush, you’d be sacrificing either rapid cooldowns or loss of ability to maintain easy mob aggro.
Build made using the free tools at New World Buddy.
For unfamiliar terms, please refer to our terminology guide.